


How Excavators Work and Why It Matters Before You Climb In
Imagine sitting in the cab for the first time, gripping two joysticks, and having no idea what will move when you push one forward. That moment of hesitation is exactly why learning how to operate an excavator begins long before the engine starts. Every confident excavator operator builds a mental picture of the machine first — understanding what each section does and how hydraulic force connects a thumb-sized joystick movement to thousands of pounds of digging power.
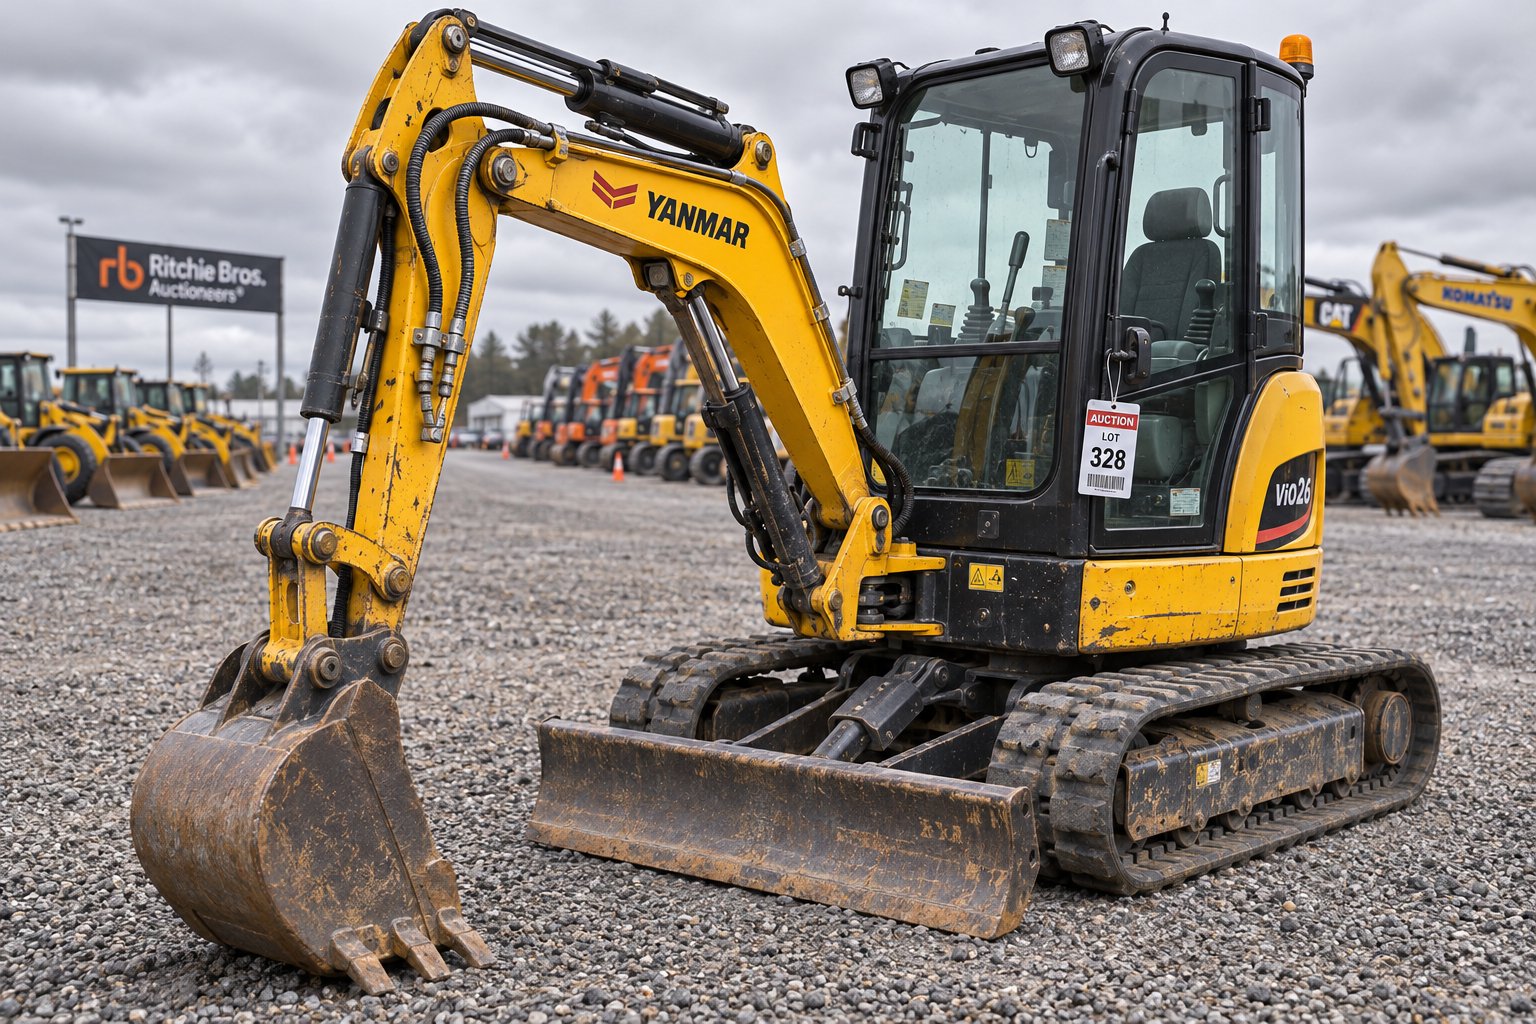
An excavator — also called a track hoe or digger on many job sites — is a hydraulic-powered machine designed to dig, lift, swing, and load material. Whether you are trenching a residential water line or excavating a commercial foundation, the underlying mechanics stay the same across every size class.
Anatomy of an Excavator and Key Components
Every excavator breaks down into three main assemblies that work as a unified system:
The undercarriage sits at the bottom. On a crawler (tracked) machine, it includes the track frames, track shoes, rollers, idlers, sprockets, and final drives. This assembly carries the full weight of the machine, provides stability during digging, and moves the excavator across the site. Wheeled models swap the tracks for tires and axles, but the structural role is identical.
The upper structure — often called the "house" — is the rotating platform that sits on top of the undercarriage. It holds the operator cab, diesel engine, hydraulic pump, control valves, and a heavy counterweight at the rear. A large-diameter swing bearing connects the house to the undercarriage and allows a full 360-degree rotation independent of the tracks. You can dig in one direction and dump in another without repositioning the machine.
The front-end attachment assembly consists of the boom, stick (also called the dipper arm), and bucket. Each section is powered by its own hydraulic cylinder, giving the operator precise control over reach, depth, and scooping force. The boom raises and lowers, the stick extends and retracts, and the bucket curls and dumps. Together, these three components create the articulated arm that performs the actual work.
How the Hydraulic System Drives Every Movement
Sounds complex? The principle is surprisingly straightforward. The diesel engine spins a hydraulic pump, which pressurizes hydraulic oil. When you push a joystick, you open a small pilot valve that sends a low-pressure signal to the main control valve. That valve then directs high-pressure fluid to the correct cylinder or motor, creating movement. Release the joystick, and the valve returns to neutral — fluid stops flowing, and the component holds its position.
Two concepts make the system click. Pressure controls how much force the machine can exert — think of it as digging power. Flow controls how fast a cylinder extends or retracts — think of it as movement speed. A proportional valve means pushing the joystick halfway produces half the speed, giving you smooth, graduated control rather than a jarring all-or-nothing response.
Because one hydraulic pump supplies multiple functions, running the boom, stick, and swing simultaneously divides the available flow among them. This is why the machine feels slightly slower during combined movements — a detail every new excavator operator notices within the first few minutes of practice.
Why the Mental Model of Boom-Stick-Bucket Geometry Matters
Before you ever curl a bucket into the ground, picture the arc each component follows. The boom sweeps in a long vertical arc from the machine's shoulder. The stick swings through a tighter arc at the boom's tip. The bucket rotates through the shortest arc at the end of the stick. Layering these three arcs together is what creates a smooth, efficient dig cycle — and it is the concept you will rely on every time you plan a cut, set a trench depth, or load a truck.
Here are the six primary excavator movements you will control from the cab:
- Boom up / down — raises or lowers the entire front-end assembly
- Stick in / out — retracts the stick toward the cab or extends it away
- Bucket curl / dump — scoops material inward or releases it
- Swing left / right — rotates the upper structure on the swing bearing
- Travel forward / reverse — drives the tracks or wheels
- Blade up / down — raises or lowers the dozer blade (common on mini and small excavators)
Memorizing these six movements is the foundation. The real skill — and what separates a beginner from someone ready to how to become an excavator operator professionally — is blending multiple movements into one fluid motion. That blending starts with choosing the right machine for the job.
Step 1 – Selecting the Right Excavator Type and Size for Your Job
Picking up the excavator controls without first choosing the correct machine for the task is like sharpening a knife before knowing what you need to cut. A 1-ton mini excavator and a 50-ton crawler share the same boom-stick-bucket geometry, yet they serve wildly different purposes. Getting this decision right saves money, prevents site damage, and sets the stage for efficient digging with an excavator from the first bucket load to the last.
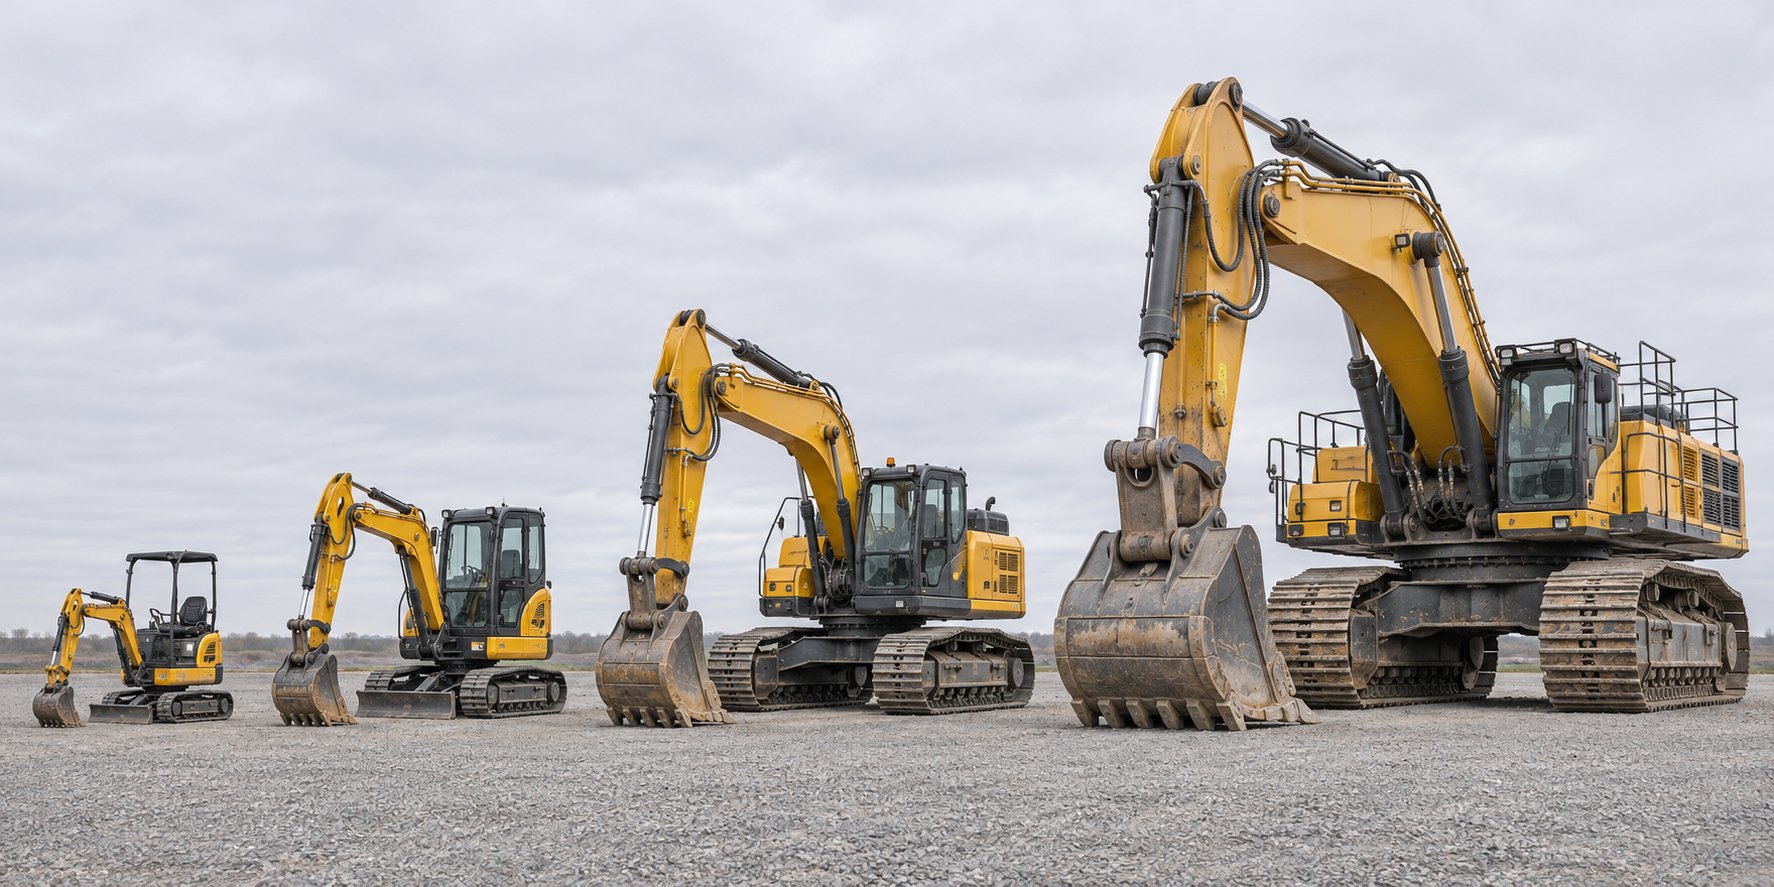
Excavators are grouped by operating weight — the total weight of the machine fueled, lubricated, and ready to work. That single number is a reliable proxy for digging force, dig depth, reach, and footprint. When someone on a job site mentions a "5-ton" or "30-ton" machine, they are naming the weight class, and from that you can quickly gauge what the excavator can and cannot do.
Mini, Mid-Size, Standard, and Large Excavator Classes
Four broad classes cover the full spectrum of construction machinery used for excavation work. The table below breaks them down so you can compare at a glance:
| Class | Approx. Operating Weight | Typical Dig Depth | Common Applications | Best-Fit Project Types |
|---|---|---|---|---|
| Mini | Under ~1.5 tons | 5 - 7 ft | Shallow trenching, landscaping, tight-access utility work | Fenced backyards, side-yard plumbing, small irrigation lines |
| Compact / Mid-Size | ~1.5 - 10 tons | 8 - 16 ft | Residential footings, utility trenches, driveway prep, grading | Suburban lot work, water and sewer lines, small commercial pads |
| Standard | ~10 - 45 tons | 17 - 27 ft | Basements, ponds, deep utility corridors, site mass grading | Commercial foundations, road construction, large residential lots |
| Large | 45 tons and up | 27 ft+ | Mass excavation, quarry work, mining, major civil infrastructure | Highway cuts, dam construction, open-pit operations |
Mini excavators squeeze through a standard 36-inch gate and feature near-zero tail swing, making them ideal for landscaping and shallow utility runs where space is the primary constraint. Compact and mid-size machines — often called the workhorse class — handle the bulk of residential and small-commercial excavation while still fitting on a standard equipment trailer. Standard machines step up when you need serious volume, deeper reach, and the stability to swing heavier loads. Large excavators rarely appear on a residential lot; if the project requires one, the entire scale of the operation is different.
Purchasing every class new is unrealistic for most contractors, especially those building a fleet across multiple weight ranges. Sourcing quality used machines is a practical way to access the right class for each project without absorbing full retail cost. Platforms like JIUHONG's used excavator collection bring together compact and larger machines from multiple brands in one place, letting contractors, equipment dealers, and import buyers compare listings and request model-specific quotes — a useful step during the selection process.
Wheeled vs. Tracked Undercarriages
You already know that a track hoe refers to a tracked excavator — but what about wheels? Wheeled excavators have been popular in Europe for decades and are gaining ground in North America, particularly with municipalities and utility crews working along paved roads.
Here is a quick way to decide which undercarriage suits your situation:
- Wheeled mini excavators excel in urban or road-adjacent work. They travel faster on hard surfaces (some models reach 12 mph), cause no damage to asphalt or finished pavement, and eliminate the need for a lowboy trailer to shuttle between nearby sites. Wheeled models are as stable as crawlers when outfitted with blade-down stabilizers, and a short-swing wheeled excavator can work within a single traffic lane — a real advantage for utility repairs.
- Tracked (crawler) undercarriages are mandatory on soft ground, muddy terrain, slopes, or unpaved job sites. The wider contact patch distributes weight evenly, reducing ground pressure and preventing the machine from sinking. Tracks also provide superior traction on grades and loose material. If your site involves anything beyond a hard, level surface, crawlers are the safer bet.
One configuration worth noting is zero-tail-swing, common on compact models. These machines keep the counterweight within the track width, allowing them to rotate next to walls, fences, or adjacent structures without striking obstacles. If you plan to work in tight quarters, confirm the zero-tail-swing spec against the manufacturer's data sheet for the specific machine you are considering — aftermarket modifications or different boom configurations can change the true swing radius.
Matching Machine Size to Job Scope
Rather than guessing, walk through a simple decision framework based on the work at hand:
- Residential utilities (water line, gas service, irrigation) — a mini or compact excavator in the 1- to 5-ton range handles the depth and fits through limited-access points.
- Residential foundations and driveways — a mid-size machine between 5 and 10 tons provides the dig depth and bucket volume to stay productive without rutting a developed lot.
- Commercial foundations and deep trenching — a standard excavator between 10 and 30 tons delivers the reach, breakout force, and cycle speed the timeline demands.
- Major earthmoving, road cuts, and mass grading — standard to large machines above 30 tons move serious volume quickly, though they require adequate site access and ground protection.
When two classes could both handle the scope, the smaller machine that finishes the job inside the site's constraints is almost always the more cost-effective choice. Bigger is not a tiebreaker — access, transport logistics, and total cycle time are.
One more consideration for buyers sourcing equipment internationally: an excavator exported from any country is not necessarily manufactured by a domestic brand. A machine shipped from Japan might carry a European nameplate, and a unit leaving a Chinese port could be a Caterpillar, Komatsu, or Volvo. Always verify the original manufacturer, serial number, and model designation before finalizing a purchase. Checking the machine's data plate against the OEM's serial-number database confirms authenticity and helps you order the correct parts down the road.
With the right machine identified and either on site or on order, the next critical step happens before you ever fire up the diesel — a thorough pre-operation inspection that catches issues while they are still inexpensive to fix.
Step 2 – Performing a Complete Pre-Operation Walk-Around
A cracked hydraulic hose does not care that you are behind schedule. Neither does a low oil level or a track shoe with missing bolts. These problems announce themselves on their own timeline — usually at the worst possible moment — and the repair bill dwarfs the ten to fifteen minutes a proper walk-around would have taken. Industry data reinforces the point: roughly 80% of common excavator failures are preventable with consistent daily checks, yet many operators skip this step entirely. If you want to learn how to run an excavator reliably, start here — not at the joysticks.
The goal is a repeatable, same-sequence routine you perform before every shift. Pick a starting point on the machine — most experienced operators begin at the left-rear corner — and circle clockwise so nothing gets overlooked. Below is the inspection broken into three focused zones.
Fluid Levels and Engine Compartment Checks
Fluids are the lifeblood of every hydraulic machine. Low levels or contaminated fluid can destroy pumps, overheat engines, and turn a productive day into a tow-truck call. Work through these checks in order:
- Engine oil — Pull the dipstick with the engine cold. Oil should sit between the low and full marks and appear amber to dark brown — not milky or gritty.
- Hydraulic fluid — Check the sight glass or hydraulic dipstick. The level should be within the marked operating range. Pay attention to the fluid's color: clean hydraulic oil is typically clear to light amber. Dark, cloudy, or foamy fluid signals contamination or aeration, both of which accelerate pump wear.
- Coolant reservoir — Verify the coolant sits at or above the minimum line on the expansion tank. Never open a pressurized radiator cap on a hot engine.
- Fuel level — Confirm adequate fuel for the planned shift. Check the water separator bowl at the same time and drain any accumulated water.
- DEF level (if equipped) — Diesel Exhaust Fluid is required on Tier 4 Final machines. Running empty triggers a power derate that can shut down productivity mid-dig.
While the engine compartment is open, glance at the air filter indicator. A red flag or gauge reading in the service zone means the filter element needs cleaning or replacement — especially on dusty sites where intake restriction can climb fast.
Undercarriage and Track Tension Inspection
The undercarriage is the most expensive assembly on a tracked excavator, accounting for up to 50% of total maintenance costs over the machine's life. A few minutes of visual inspection each morning pays for itself many times over.
Walk along each side of the undercarriage and check the following:
- Track tension — Most manufacturers specify approximately two to three inches of sag at the midpoint between the front idler and rear sprocket when the track is lifted off the ground. Too loose, and the track can derail on slopes or turns. Too tight, and you accelerate wear on sprockets, rollers, and links. Your operator's manual lists the exact specification for your model.
- Track shoes — Look for cracked, bent, or missing shoes and loose or sheared mounting bolts. A single missing shoe bolt can lead to a thrown track within hours.
- Sprocket teeth — Inspect for hooked, worn, or chipped teeth. Uneven wear patterns often indicate improper track tension or alignment issues.
- Rollers and idlers — Spin each roller by hand if possible. They should turn freely without binding or grinding. Leaking oil around a roller seal means the roller is near the end of its service life.
- Debris buildup — Mud, rocks, and roots packed into the undercarriage add dead weight, accelerate wear, and can freeze overnight in cold climates. Clear packed material before it hardens.
When inspecting, work one side at a time and remember that the drive sprocket sits at the rear of the machine. Keeping your inspection organized by side prevents mix-ups when you report findings or order parts.
Hydraulic Hoses, Bucket Teeth, and Structural Integrity
Hydraulic failures average among the costliest repairs on any excavator — a single incident can run anywhere from a couple thousand dollars up to $95,000 for a full system replacement. Most of those failures start small: a weeping hose fitting, a hairline crack in a cylinder mount, or a pinhole leak that sprays fluid under pressure.
During your walk-around, trace every visible hydraulic hose from fitting to fitting. Look for bulges, abrasion marks, oil residue, and cracked rubber. Run a gloved hand along cylinder rods and check for scoring or pitting — even minor surface damage lets contaminants past the seal and into the system. Examine the boom and stick at weld joints and pin connections; structural cracks tend to originate at high-stress points and spread under load.
At the bucket, check each tooth for wear and secure attachment. A worn or missing tooth reduces digging efficiency and can break loose in the trench, creating a buried obstruction you will have to find later. If your machine uses a thumb or quick coupler, verify the locking mechanism is fully engaged and the retaining pins are seated.
A failed pre-operation check is the leading preventable cause of on-site hydraulic failures. The few minutes you invest before startup protect hours of productive digging — and potentially tens of thousands of dollars in emergency repairs.
Before climbing into the cab, finish with a quick safety-systems sweep. Confirm that mirrors are clean and properly adjusted, the seat belt latches and retracts without fraying, the horn sounds when pressed, and the backup alarm activates. These items are easy to overlook yet critical for anyone learning how to operate excavator equipment safely around ground crews.
A clean walk-around gives you confidence that the machine is mechanically ready. The next thing standing between you and actual dirt work is knowing exactly what happens when you push each joystick — and that depends on which control pattern the machine is wired for.
Step 3 – Understanding Excavator Controls and Joystick Patterns
Two joysticks, four main functions — and one pattern mismatch that can send the boom crashing down when you meant to extend the stick. That scenario plays out whenever an operator climbs into an unfamiliar machine and assumes the controls are mapped the way they were on the last one. Operating an excavator confidently starts with knowing which joystick pattern is active and what every direction does before you make a single dig.
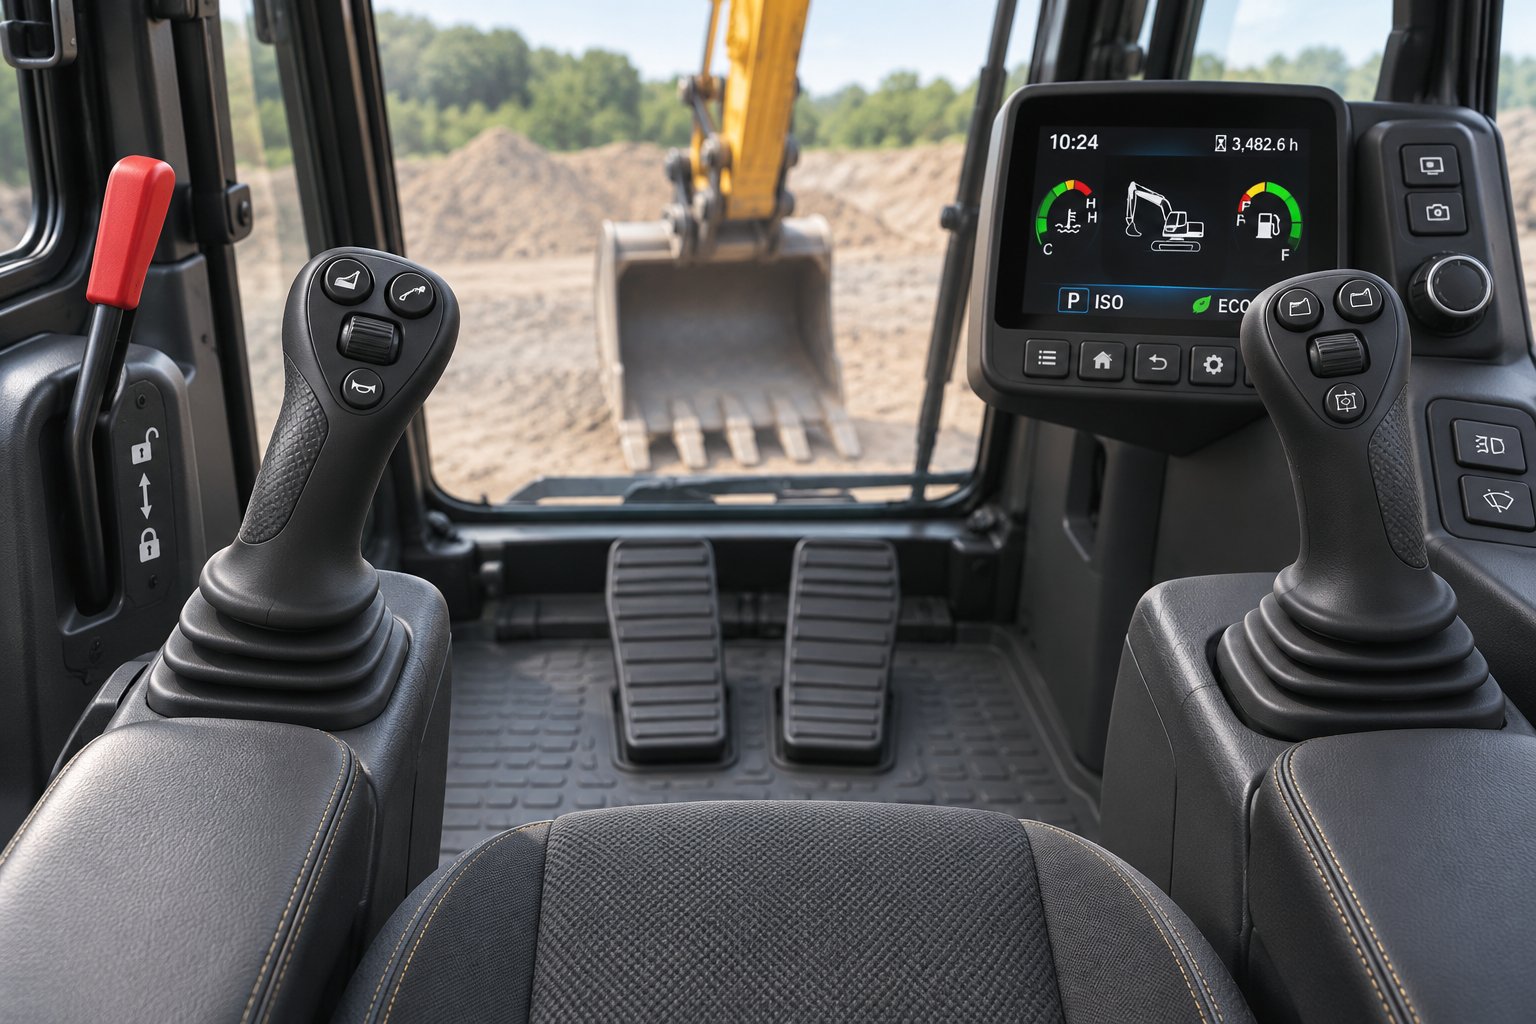
Excavators use one of two primary control layouts: ISO (established by the International Organization for Standardization) and SAE (defined by the Society of Automotive Engineers). You might hear the ISO layout called "excavator controls" or "CAT controls," while SAE is frequently referred to as "backhoe controls" or "John Deere controls." The nicknames vary by region and brand, so the safest habit is to read the function decal inside the cab — not the brand badge on the door — every single time you sit down in a new machine.
Many modern excavators, from a compact wheeled mini excavator to a 40-ton crawler, include a pattern-change valve or an electronic selector that lets you swap between ISO and SAE. On some models this switch lives under the floorboard; on others, it is accessible through the cab monitor. Either way, confirm the active setting before your first input.
Left Joystick Functions in ISO and SAE Patterns
The left joystick is where the two patterns diverge most. In the ISO pattern, pushing the left stick forward extends the stick (arm) away from you, while pulling it back retracts the stick toward the cab. Moving it left or right swings the upper structure. In the SAE pattern, that same left stick controls the boom — push forward to lower, pull back to raise — while the left-right swing movement stays identical.
Here is a quick way to remember the difference: side-to-side functions stay the same in both patterns. Swing always lives on the left stick's lateral axis, and bucket always lives on the right stick's lateral axis. The change happens on the fore-aft axes, where boom and stick trade places between joysticks.
The table below maps every joystick direction to its machine response in both patterns. Read it from the seated operator's perspective — "forward" means pushing the joystick away from you.
| Joystick Direction | ISO (Excavator Pattern) | SAE (Backhoe Pattern) |
|---|---|---|
| Left stick — forward | Stick (arm) out | Boom down |
| Left stick — back | Stick (arm) in | Boom up |
| Left stick — left | Swing left | Swing left |
| Left stick — right | Swing right | Swing right |
| Right stick — forward | Boom down | Stick (arm) out |
| Right stick — back | Boom up | Stick (arm) in |
| Right stick — left | Bucket curl (close) | Bucket curl (close) |
| Right stick — right | Bucket dump (open) | Bucket dump (open) |
Pick one pattern and commit to it. Operators who bounce between ISO and SAE develop hesitation at the joysticks, and hesitation on a loaded swing or a steep grade is where mistakes turn into incidents.
Right Joystick and Boom-Bucket Coordination
Regardless of pattern, the right joystick always handles the bucket's curl and dump on its lateral axis. That consistency is what makes scooping and dumping feel familiar across machines — you flick the stick left to curl in, right to open.
The fore-aft axis of the right stick controls either the boom (ISO) or the stick/arm (SAE). This is the axis new operators tend to slam to full throw, sending the boom lurching up or the arm shooting out. Resist that urge. Excavator hydraulics are proportional — pushing the joystick halfway produces roughly half the speed. Feathering the input lets you place the bucket precisely, adjust trench depth by inches rather than feet, and load a truck without slamming material into the bed. Think of it as squeezing a trigger, not flipping a switch.
When you begin blending boom and bucket on the right stick, you will push diagonally — a little forward to lower the boom while tilting left to curl the bucket into the cut. That combined input is the foundation of a smooth dig cycle, and it becomes intuitive only through deliberate, low-throttle practice with single-axis movements first.
Pedals, Levers, and Auxiliary Controls
The joysticks handle the front-end work, but several other controls complete the picture for anyone learning how to drive an excavator across a site and use attachments once they arrive at the work area.
- Travel pedals/levers — Each track has its own control, typically a combined hand lever and foot pedal. Push both forward for straight travel; pull both back to reverse. Push one forward and hold the other neutral to turn, or drive the tracks in opposite directions for a counter-rotation spin turn. On a wheeled mini excavator, a steering wheel or similar input replaces the dual-lever setup.
- Blade control — A dedicated lever raises and lowers the front dozer blade, used for backfilling, rough grading, and — crucially — stabilizing the machine during digging. Keeping the blade pressed down while trenching adds a third ground-contact point and prevents the front end from lifting.
- Auxiliary hydraulic switch or pedal — This control routes hydraulic flow to powered attachments such as breakers, augers, or hydraulic thumbs. Some machines use a foot pedal; others assign a rocker switch or thumb roller on the right joystick. Confirm the flow direction and activation method before connecting any attachment.
- Safety lock lever (gate lever) — A lever or bar — usually at the operator's left side — that must be lowered to activate all hydraulic controls. When raised, it locks out every joystick, pedal, and lever so nothing moves accidentally. Engage it every time you enter or exit the cab, and whenever anyone approaches the machine's working radius.
A quick five-minute drill ties all of this together. On flat, open ground at low idle, cycle each function individually: boom up and down, stick in and out, bucket curl and dump, swing left and right, then drive the tracks forward, back, and through a spin turn. Only after each movement feels predictable should you start combining two functions on the same joystick. That methodical progression — isolate, then blend — is the fastest path from fumbling to fluid control, and it sets you up for the next milestone: starting the engine properly and traveling to the dig zone without incident.
Step 4 – Starting the Machine and Traveling to the Work Area
You have walked the machine, checked every fluid, and confirmed which joystick pattern is active. The cab door is open, the seat is waiting — and this is where many tutorials skip ahead to digging. In practice, the sequence between climbing in and reaching the work area is one of the most error-prone phases for anyone learning how to use an excavator. A rushed cold start shortens engine life, and sloppy track travel on a crowded site creates hazards that no amount of digging skill can undo.
Engine Start Sequence and Warm-Up Procedure
Treat the startup like a checklist, not a race. Every step exists for a mechanical or safety reason, and skipping one can damage the machine or put people at risk. Here is the sequence from the moment you step onto the track frame:
- Mount using three points of contact — two hands and one foot, or two feet and one hand on the grab handles and steps. Never jump into the cab.
- Fasten the seat belt — adjust the lap belt snug across your hips. On machines equipped with a retractable shoulder harness, buckle that as well.
- Lower the safety lock lever — pull the gate lever down to the operating position. On most machines, the ignition circuit will not engage while this lever is raised.
- Set the throttle to low idle — rotate the throttle dial or slide the lever to its lowest setting. Starting at high RPM forces cold oil through tight tolerances and spikes pressure before seals are warmed.
- Turn the key or press the start button — allow the glow plugs to cycle if the indicator illuminates (common on all diesel engines and critical in cold weather). Crank the engine and release the key as soon as it fires.
- Allow the engine to warm at low idle — the specific duration depends on ambient temperature and the machine's operating manual. As a practical baseline, Volvo CE recommends about five minutes of idling before beginning slow movements, then gradually ramping up to full power only after the temperature indicators in the cab reach normal range. In mild weather, a shorter warm-up may suffice — always defer to the manufacturer's guidelines for your specific model.
During the idle period, use the time productively. Glance at the dash gauges: oil pressure should rise within seconds of starting, coolant temperature should begin climbing steadily, and no warning lights should remain illuminated. If anything reads abnormal, shut the engine down and investigate before proceeding.
Traveling on Tracks and Steering the Machine
Here is a detail that trips up nearly every first-time operator: excavator tracks do not steer like a car. There is no steering wheel, no differential, and no concept of "turning the wheel." Each track has its own independent drive motor, and steering happens by varying the speed — or direction — of one track relative to the other.
Before you push the travel levers forward, orient the machine correctly. The drive sprockets should be at the rear for forward travel. If you are sitting in the cab and can see the sprockets behind you through the rear camera or mirrors, the machine is facing the right way. Traveling with the sprockets forward reverses your steering inputs — left becomes right — and places the idler under drive loads it was not designed to handle.
Three steering methods cover every situation you will encounter on site:
- Straight travel — push both travel levers (or pedals) forward at the same rate. The machine moves in a straight line. Pull both back for a straight reverse.
- Gradual turn — push one lever forward while holding the other at neutral. The stationary track acts as a pivot point, and the machine arcs around it. For a wider turn, push both levers forward but apply less pressure on the side you want to turn toward.
- Counter-rotation (spin turn) — push one lever forward and the other backward simultaneously. The tracks drive in opposite directions, spinning the machine on its center point. This is the tightest turn possible and is invaluable for repositioning in confined areas, but it tears up soft ground quickly.
Keep the boom lowered and centered over the front of the tracks while traveling. A raised boom shifts the center of gravity high and forward, making the machine top-heavy and harder to control — especially at speed. Most excavators travel between 2 and 4 mph in low range, so "speed" is relative, but momentum still matters when you are moving 10, 20, or 50 tons of steel.
Navigating Slopes, Ramps, and Uneven Terrain
Flat, dry ground is forgiving. Slopes are not. A machine that feels perfectly stable on level earth can become dangerously unstable the moment it tilts 15 or 20 degrees to one side. Understanding how do excavators work on grades comes down to one principle: keep the center of gravity low and pointed in the safest direction.
Follow these terrain-specific travel rules every time the ground angle changes:
- Always travel up and down slopes — never across them. Traversing a steep grade exposes the machine's narrow side profile to gravity, dramatically increasing rollover risk.
- Face the boom uphill and keep it lowered when driving up or down a grade. On ascent, the boom acts as a forward counterbalance. On descent, it lowers the center of gravity and gives you the option of planting the bucket for emergency braking.
- Use low-range travel on any slope. High range increases track speed but reduces the hydraulic braking effect, making it harder to control descent speed.
- Avoid sudden steering inputs on a grade. A sharp turn mid-slope shifts weight unpredictably. If you need to change direction, travel to a level area first, reposition, and then proceed.
- Clear the path visually before committing. Wet grass, loose gravel, clay, and frozen ground all reduce traction. Conduct a site assessment for soft spots, hidden drop-offs, and unstable fill before driving onto any slope.
- Lower the blade (if equipped) on descent. Dragging the blade lightly acts as a secondary brake and stabilizer, especially on loose or sandy terrain.
- Never park on a slope unless absolutely necessary. If you must, swing the house so the boom faces downhill, lower the bucket teeth into the ground, and engage the safety lock lever. Chock the tracks if the machine will sit overnight.
Icy or frozen conditions add another layer of risk. Compacted snow and ice slash traction to a fraction of what dry soil provides. In cold-weather operations, clear snow and ice from the tracks and undercarriage before travel — packed material can interfere with boom movement and even crack hydraulic components once it freezes solid overnight.
Arriving at the work area safely is only half the milestone. Positioning the machine for productive, efficient digging is the other half — and that requires a command of dig-cycle technique that separates operators who move dirt from operators who shape a site.

Step 5 – Mastering Digging Techniques for Real Job-Site Scenarios
Knowing which joystick does what and how to travel across a site is one thing. Shaping the ground efficiently, accurately, and safely is an entirely different skill. This is where the mental model of boom-stick-bucket geometry you built in the first section starts earning its keep — because every digging scenario demands a slightly different combination of those arcs, and the operator who plans each cycle outperforms the one who simply reacts.
Basic Dig Cycle and Bucket Curl Timing
Every pass of the bucket follows a four-phase dig cycle, whether you are running a 2-ton compact machine or a 40-ton crawler. Understanding these phases is one of the most practical operating tips any new operator can internalize:
- Phase 1 — Position the bucket teeth. Lower the boom and extend the stick until the bucket teeth contact the ground at the starting edge of your cut. The teeth should enter the material at a slight forward angle, not flat and not vertical.
- Phase 2 — Crowd the stick. Pull the stick toward the cab in a steady, controlled arc. This is the primary digging motion — the stick cylinder does the heavy work of dragging the bucket through the material. Keep the boom relatively stable during this phase; raising it too early lifts the bucket out of the cut before it fills.
- Phase 3 — Curl the bucket. As the stick approaches mid-stroke and the bucket is roughly three-quarters full, curl the bucket inward to capture the load. Timing is everything here. Curl too early and you scoop a shallow bite, leaving material behind. Curl too late and loose soil spills over the back edge, wasting half your pass. Watch the bucket teeth angle relative to the ground — when they begin to ride up out of the cut naturally, that is your cue to curl.
- Phase 4 — Lift and swing to dump. Raise the boom just enough to clear the trench edge and begin your swing toward the spoil pile or truck. A key efficiency practice: pre-position during the swing by starting to lower and uncurl the bucket as you approach the dump point. Arriving already positioned to release removes dead time from every cycle.
Over hundreds of passes per shift, even a two-second improvement in curl timing compounds into significant productivity gains. A curling bucket motion through the dig stroke — rather than a fixed, open drag — fills faster with less hydraulic strain, particularly in layered or compacted ground.
Trenching to a Specific Depth and Width
Trenching is the scenario most people picture when they think about how to use excavator equipment on a utility job. A clean trench has consistent depth, straight walls, and a flat floor — none of which happen by accident.
Start by establishing your reference. Grade stakes set by the survey crew mark the target depth and alignment. On sites using laser technology, mount a laser receiver on a grade rod and set it to the design elevation. The receiver beeps or flashes when the bucket floor matches the target, letting you work without constantly climbing out to check with a tape measure. On-board grade guidance systems take this further by tracking bucket position in real time against a 3D design, eliminating rework caused by over-digging or missing grade.
Maintain a consistent bucket angle on every pass so the trench floor stays level rather than scalloped. After each digging pass, make a final flat drag along the trench bottom — lower the bucket with teeth level, apply light downward pressure, and pull the stick back slowly. This "cleaning pass" smooths ridges and brings the floor to a uniform elevation.
When the required trench depth exceeds your stick's reach from a single bench, use a bench-cutting technique. Dig the top half of the trench first across the full length, then reposition the machine at the lower bench level and excavate the remaining depth. Bench cutting keeps each pass within the machine's efficient working range and avoids overextending the stick, which weakens breakout force and puts unnecessary stress on the boom cylinder.
Spoil placement matters just as much as the dig itself. Position the spoil pile a safe distance from the trench edge — never right at the lip. A pile stacked too close adds surcharge weight to the trench wall and increases the risk of a cave-in, which is both a safety hazard and an OSHA violation.
Excavating Near Existing Structures and Utilities
Digging in open ground is forgiving. Digging three feet from a gas main, a fiber-optic conduit, or a building foundation is not. This is where mini excavator operation around residential lots and urban sites demands a different mindset — precision over speed, communication over production.
Before any bucket touches dirt near marked utilities, contact 811 (the national Call Before You Dig hotline) or your region's equivalent locating service. Utility locators will mark buried lines with color-coded paint or flags. These markings establish a tolerance zone — typically 18 to 24 inches on each side of the mark — within which hand digging or vacuum excavation replaces mechanical digging.
When working close to structures or located utilities, coordinate with a spotter using standardized hand signals. The spotter maintains a clear line of sight to the bucket and the hazard, directing the operator to slow, stop, or adjust depth. Reduce your swing speed and throttle setting to give yourself more reaction time. A machine running at high RPM moves the bucket faster than you can correct a mistake when you are inches from a live line.
Striking an underground utility is both a safety emergency and a legal liability. A ruptured gas line can cause an explosion, a severed electrical cable can electrocute ground crew, and the responsible party faces regulatory fines, repair costs, and potential criminal charges. No schedule deadline justifies skipping the locate process.
Loading Material into Haul Trucks
Efficient truck loading is a rhythm. Get the rhythm right and you keep trucks moving, spoil cleared, and the trench advancing. Get it wrong and you create a bottleneck that stalls the entire operation — even a fast digger looks slow when trucks sit waiting or material lands everywhere except the bed.
Positioning is the first variable to control. Park the haul truck so the bed sits roughly perpendicular to the excavator's swing arc, close enough to minimize swing angle but far enough to stay outside the trench collapse zone and clear of the spoil pile. The less time you spend swinging, the more time you spend digging — a principle field-tested operators and industry guides consistently reinforce.
Follow this sequential loading technique to fill evenly and protect the truck:
- Start loading from the corner nearest the truck cab and work toward the tailgate. This front-loads the weight over the drive axle for better traction during pullout and ensures even distribution without the driver needing to reposition.
- Swing to the dump point at a controlled speed. A loaded bucket on a fast swing builds momentum that is hard to stop precisely, leading to overshoot and spillage off the far side of the bed.
- Dump from the lowest safe height. Raising the boom to maximum and dropping a full bucket of rock or wet clay from six feet up damages the truck bed, cracks liners, and sends material bouncing out of the box. Lower the bucket to just above the sideboards and open smoothly.
- Curl the bucket closed before swinging back to the trench. An open bucket swinging over the ground crew or past the cab is a falling-object hazard. Close it before you leave the dump zone.
- Vary your dump point across the bed with each pass to spread the load evenly. Piling every bucket in the center creates a peak that limits total payload and shifts the center of gravity dangerously high.
When loading from a deep excavation, you may need to boom up significantly to clear the truck's sideboards. In that situation, pause the swing momentarily at the dump point, raise to the clearance height, dump, then lower before swinging back. Adding that brief pause prevents the combined boom-raise-and-swing motion from destabilizing the machine, especially on uneven ground.
Mastering these digging and loading techniques gives you the core skill set for moving earth. Yet an excavator rarely spends its entire life with a digging bucket attached — and the real versatility of the machine opens up when you learn to swap and operate the attachments that turn a digger into a grading tool, a demolition hammer, or a material handler.
Step 6 – Working with Attachments for Grading, Demolition, and More
A digging bucket handles the bulk of excavation work, but it is only one tool in a much larger kit. Swap that bucket for a hydraulic breaker and you have a concrete demolition rig. Bolt on an auger and you are drilling post holes. Attach a thumb and you can grab, sort, and place debris with the precision of an oversized hand. Understanding how does an excavator work as a multi-purpose platform — not just a trencher — is what separates a one-task operator from someone who earns a return on every hour of machine time.
Selecting and Swapping Attachments Safely
Excavator attachments connect to the stick tip through one of two methods: a pin-on system (manual pins secured with keepers) or a quick coupler (a mechanical or hydraulic bracket that locks and releases without leaving the cab). Quick couplers dramatically reduce swap time — often cutting a 30-minute pin change down to under two minutes — but they introduce a critical safety step: always verify the coupler lock is fully engaged before lifting the attachment off the ground. An improperly latched coupler can release under load, dropping a thousand-pound breaker or bucket onto the ground crew below.
After connecting any attachment, cycle it slowly at low idle. Watch for hydraulic leaks at every fitting, listen for unusual sounds, and confirm the tool moves through its full range without interference from the boom or stick. On machines with electronic auxiliary settings, select the stored profile for that specific attachment so flow and pressure match the manufacturer's specifications.
Here are the most common excavator attachments and what each one does best:
- Hydraulic breaker (hammer) — breaks concrete, asphalt, rock, and frozen ground using concentrated percussive force
- Hydraulic thumb — clamps against the bucket to grab logs, boulders, pipes, and irregularly shaped debris for sorting and placement
- Ripper — fractures compacted soil, frost layers, or soft rock ahead of the digging bucket, reducing cycle effort
- Auger — drills holes for fence posts, footings, sign poles, and tree planting with consistent diameter and depth
- Tilt bucket (grading bucket) — angles its cutting edge left or right independent of the machine, ideal for slope finishing, ditch shaping, and fine grading
- Compactor plate — vibrates to compact trench backfill or sub-base material directly from the stick, eliminating the need for a separate walk-behind compactor
Grading and Finish Work Techniques
Digging a hole is brute-force work. Grading a surface flat is finesse. The difference shows up in the attachment you choose, the pressure you apply, and the throttle setting you run.
A tilt bucket — sometimes called a Scandinavian tilt bucket in wider profiles — lets you match the cutting edge to a crossfall, ditch slope, or drainage swale without constantly repositioning the entire machine. That single extra degree of freedom eliminates dozens of small track adjustments per hour, especially on landscaping contours and road shoulders where the grade changes direction frequently.
A standard fixed grading bucket works well when the surface is flat and the machine can approach squarely. It is simpler, lighter, and less expensive to maintain — a practical choice for open-area leveling, backfill spreading, and driveway prep where side-to-side angle changes are minimal.
Regardless of which bucket you use, the grading technique stays the same. Lower the bucket with the teeth level — or use a toothless edge if your bucket has one — and drag it across the surface with minimal downward pressure. The weight of the boom and stick alone provides enough force to shave high spots. Pushing harder digs ruts instead of smoothing them. Run the engine at low to mid throttle so hydraulic response is slow and controllable, and make overlapping passes the way a painter rolls a wall: consistent speed, consistent overlap, consistent pressure.
For the final trim, feather the boom-down input with your right joystick while pulling the stick slowly inward. You are essentially skimming the top fraction of an inch. Check your grade frequently with a level, string line, or laser receiver — what looks flat from the cab often hides undulations you can only catch with instruments on the ground.
Demolition and Material Handling Best Practices
Demolition work pushes both the operator and the machine harder than standard digging. A hydraulic breaker delivers repeated percussive impacts that travel back through the stick, boom, and house. A thumb gripping a slab of broken concrete loads the stick cylinder asymmetrically. Respecting the machine's limits during these high-force operations is essential excavator safety training — for the equipment and for everyone on the ground.
Using a hydraulic breaker: Position the tool bit perpendicular to the material surface. Apply firm, consistent downward pressure from the boom — enough that the tracks may lift slightly, confirming full energy transfer into the material. Start at edges or existing cracks and work inward rather than attacking the center of a slab, which gives broken pieces room to separate. Never fire the breaker into open air (called "blank firing") — the shockwave reverberates through the tool and carrier, accelerating internal wear. If the material does not break within 15 to 20 seconds at one spot, reposition and try a new point of attack rather than hammering the same location and generating destructive heat.
Using a thumb for material handling: Coordinate the thumb and bucket together — curl the bucket under the object first, then close the thumb from above to create a secure clamp. Feather the joystick for a controlled grip, especially on pipes, logs, or items that could crack under excessive force. When stowing the thumb for travel, retract it fully against the stick to prevent snagging and protect the cylinder rod.
Maintaining stable footing: Demolition generates reactive forces that standard digging does not. Lower the blade to the ground for a third contact point, keep the tracks aligned with the working direction, and avoid swinging the breaker or loaded thumb at high RPM. Side-loading — using an attachment to push or pry laterally — is the fastest way to damage cylinders and stress the boom structure.
Above all, confirm that the attachment's hydraulic flow and pressure requirements fall within your machine's auxiliary circuit output. An attachment starved of flow cycles sluggishly and overheats. One fed too much pressure risks seal failure and hose blowouts. Many modern excavators let you store flow profiles per attachment — program each tool once, and the correct settings load automatically at every swap.
Attachments expand what a single excavator can accomplish on any given day. Yet versatility only counts if the operator and the site remain safe — and that means understanding the OSHA standards, certifications, and daily safety practices that govern every hour of machine operation.
Step 7 – Meeting OSHA Safety Standards and Legal Requirements
Skill behind the joysticks means very little if the trench you just dug caves in on a worker standing at the bottom. Federal safety regulations exist precisely because excavation work is among the most hazardous activities in construction — and the operator plays a direct role in keeping the site compliant. Generic advice like "be careful" does not satisfy a compliance officer or protect a crew. What does? Understanding the specific standards that apply, knowing which credentials you need to sit in the cab legally, and running a daily safety routine that becomes second nature.
OSHA Excavation and Trenching Standards Every Operator Must Know
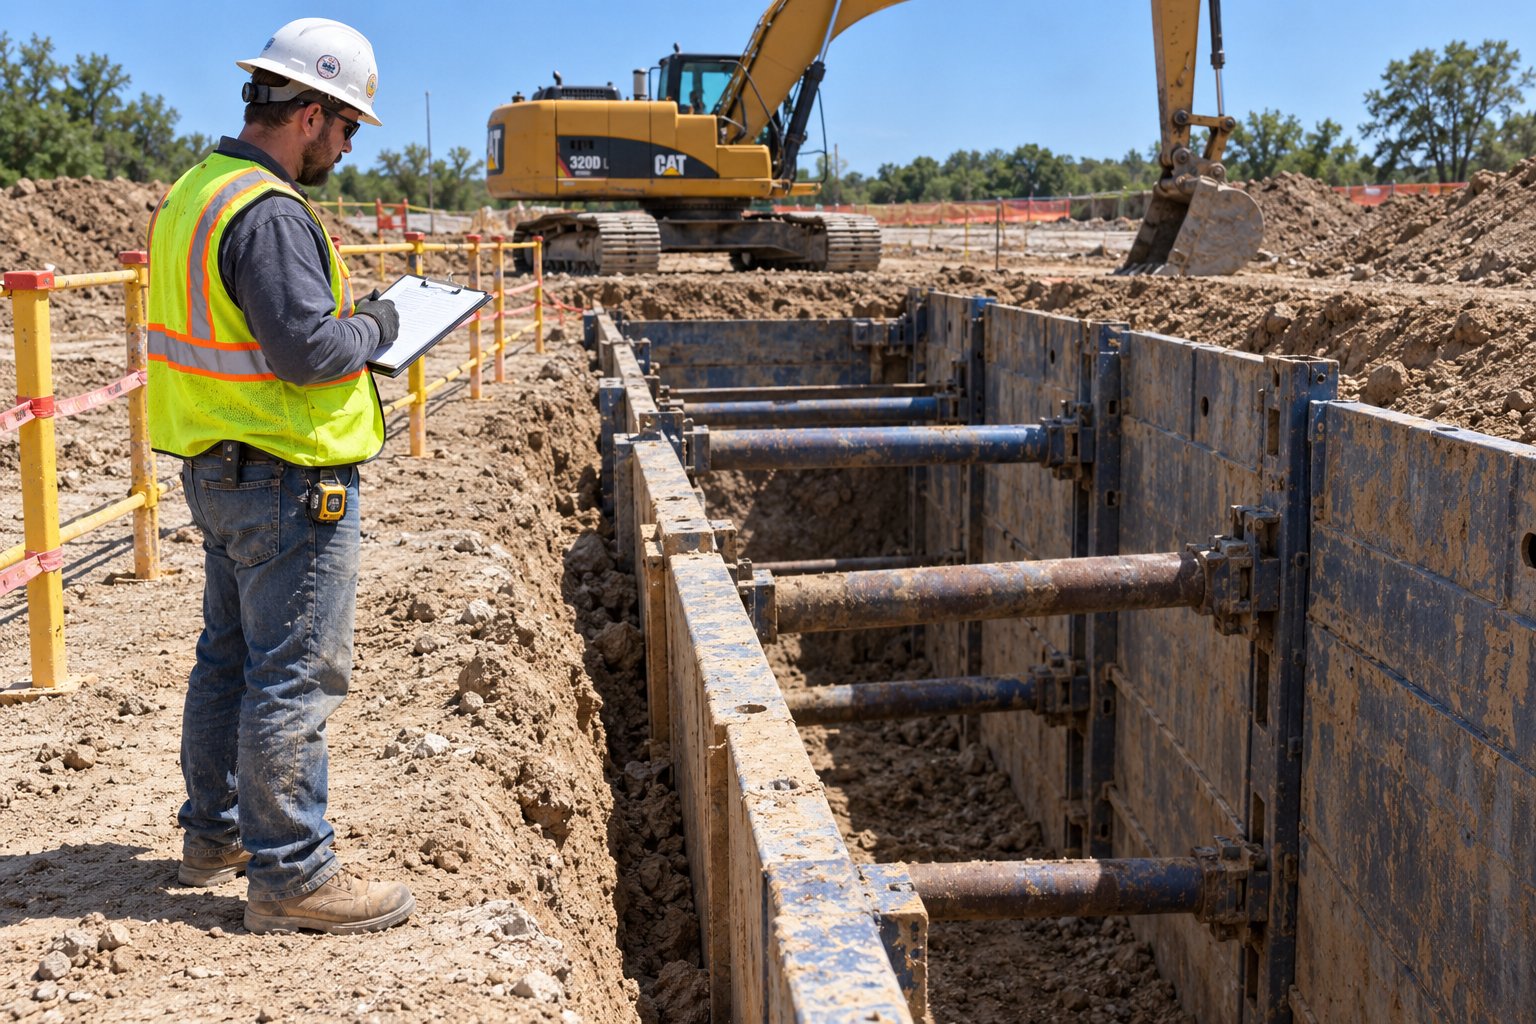
The governing regulation is OSHA 29 CFR 1926 Subpart P, which applies to every open excavation made in the earth's surface — trenches, basements, ponds, borrow pits, and any similar cut. Two requirements within this standard affect excavator operators most directly:
Protective systems for trenches five feet or deeper. Any trench reaching five feet in depth or more must have a protective system in place unless the excavation is made entirely in stable rock. The three accepted methods are sloping (cutting the trench walls back at an angle to prevent collapse), shoring (installing hydraulic or timber braces that hold the walls in place), and shielding (placing a trench box or similar structure inside the trench so workers are protected even if the walls fail). The operator's role here is practical and constant: you shape the slope angle with your bucket, you lower trench boxes into position with your boom, and you keep the spoil pile far enough from the edge that its weight does not compromise the wall.
A designated competent person must inspect the excavation. OSHA defines a competent person as someone trained to identify existing and predictable hazards and authorized to take corrective action immediately. This person inspects the trench before each shift, after rainstorms, and whenever conditions change — cracking soil, seeping water, vibration from nearby traffic. As the operator, you are often the first to notice a wall slump, a crack running along the trench lip, or water pooling at the base. Reporting these observations to the competent person without delay is not optional courtesy; it is a regulatory obligation.
Violations of Subpart P carry serious penalties. OSHA can issue citations exceeding $150,000 per willful violation, and in fatal trench-collapse incidents, criminal prosecution of responsible parties is not uncommon. Operating an excavator on a site that ignores these standards puts you — not just the general contractor — in legal jeopardy.
Licensing, Certification, and Training Requirements
Here is a question many aspiring operators ask early: do I need a license to run an excavator? The answer depends entirely on where you work. There is no single federal license for operating excavator equipment. Instead, requirements vary by state, municipality, and sometimes by the type of project (public works versus private construction). Some jurisdictions mandate formal certification from a recognized body; others accept documented employer-provided training as sufficient proof of competency.
Two nonprofit organizations dominate the heavy equipment credentialing landscape. The NCCER (National Center for Construction Education and Research) offers a broad heavy equipment operator program that covers excavators, dozers, loaders, and more — ideal for someone pursuing general operating excavator skills across multiple machine types. The NCCCO (National Commission for the Certification of Crane Operators) focuses more heavily on crane operation and rigging but also certifies operators of related heavy equipment, with testing standards developed in close coordination with Federal OSHA.
The table below compares the most common certification paths so you can evaluate which fits your career goals and local requirements:
| Certification Path | Scope | Industry Recognition | General Requirements |
|---|---|---|---|
| NCCCO | Crane operators, related heavy equipment; emphasis on rigging, signaling, and load management | Nationally recognized; meets OSHA crane operator requirements; accepted across all 50 states | Written and practical exams with strict time limits; recertification via written exam if sufficient seat time is documented |
| NCCER | General heavy equipment operation including excavators, dozers, loaders, scrapers, and compactors | Nationally recognized; credentials tracked in a portable registry accessible by employers | Written and practical exams; recertification requires retaking both exams; founded by 125+ construction industry CEOs |
| Employer-Provided Training | Machine-specific operation, site-specific safety, and company protocols | Accepted where no state or municipal certification mandate exists; documentation must be retained by employer | Varies widely — may include classroom instruction, supervised field hours, and a competency evaluation signed by a qualified trainer |
| State-Specific License | Defined by individual state or local ordinance; may cover specific machine classes or all heavy equipment | Required for legal operation within that jurisdiction; may not transfer to other states without reciprocity agreements | Typically involves passing a written knowledge test and a practical skills demonstration; renewal periods vary |
Which path should you choose? If your goal is broad employability across general construction, an NCCER credential gives you a documented skill set that employers can verify through the organization's registry. If crane work or specialized lifting is part of your trajectory, an NCCCO certification carries significant weight — particularly on union-affiliated and government-funded projects. Pursuing credentials from both organizations, as many training schools facilitate, gives you the strongest possible profile for anyone looking to how to operate heavy equipment professionally.
Regardless of the credential you pursue, keep your training documentation accessible. Wallet cards, certificates, and employer sign-off sheets should travel with you to every job site. An inspector who asks for proof of training will not accept "it's at the office."
Daily Safety Practices on the Job Site
Certifications get you in the cab. Daily habits keep everyone around the machine alive. Operating mini excavator equipment in a tight residential lot or running a 30-ton crawler on a highway project — the foundational safety practices are identical, and skipping them is how close calls turn into incident reports.
Use this quick-reference checklist at the start of every operating session:
- Walk the swing radius before starting work — confirm no tools, materials, or personnel are within the arc the tail and counterweight will sweep during rotation.
- Assign a spotter for blind-spot operations — the cab's blind zones shift depending on boom position and swing angle. A spotter with direct radio or visual contact fills gaps that mirrors and cameras cannot.
- Never allow personnel under the boom, stick, or bucket — not to inspect, not to attach a sling, not for any reason while the machine is running. If someone must work beneath the front end, lower all components fully to the ground and engage the safety lock lever first.
- Wear the seat belt at all times — in a rollover, an unbuckled operator is thrown from the cab or crushed by the ROPS (Roll-Over Protective Structure). The seat belt keeps you inside the survival zone the ROPS creates.
- Maintain three points of contact when entering and exiting — never jump off the machine. Slippery steps, muddy boots, and uneven ground make falls from equipment one of the most common non-fatal injuries in construction.
- Sound the horn before swinging, traveling, or starting any new operation — a two-second warning gives ground crew time to verify their position relative to the machine's movement path.
- Keep the safety lock lever engaged whenever leaving the seat — even for a moment. An unlocked machine with an unoccupied seat can be activated by a falling object, a curious bystander, or a crew member who leans on a joystick.
- Know the location of the emergency shutoff — most excavators have an external engine-kill switch accessible from the ground. Point it out to your spotter and ground crew at the start of every shift so anyone can stop the machine if the operator is incapacitated.
Safety is not a separate task bolted onto the end of your excavator train routine — it is the framework inside which every dig cycle, every attachment swap, and every track movement takes place. The operators who internalize these practices early are the same ones who shut the machine down properly at the end of the day, troubleshoot beginner mistakes calmly, and build real confidence through deliberate repetition.
Step 8 – Shutting Down Safely and Fixing Common Beginner Mistakes
The last bucket of the shift hits the spoil pile, the trench is clean, and the truck pulls away. Most beginners kill the engine right there — key off, door open, boots on the ground. That shortcut costs money every time it happens. A turbocharged diesel engine that goes from full load to zero RPM in seconds sends oil-starved heat straight into the turbo bearings, shortening the life of a component that can cost several thousand dollars to replace. Knowing how to work an excavator includes knowing how to stop one properly, and a disciplined shutdown protects the machine, the hydraulics, and your next cold start.
Proper Shutdown and Post-Operation Inspection Sequence
Treat shutdown as the reverse mirror of your startup checklist. Every step has a mechanical purpose, and skipping one creates a problem you will inherit tomorrow morning. Follow this sequence at the end of every operating session:
- Lower all attachments to the ground — rest the bucket flat with the teeth down so no hydraulic cylinder is holding weight overnight. A raised boom left on a cooling machine bleeds pressure slowly through contracting seals, and a bucket that drops unexpectedly is a crushing hazard.
- Return the swing to the travel position — center the upper structure so the boom faces directly over the tracks. This positions the machine for safe travel at the start of the next shift and distributes weight evenly across the undercarriage while parked.
- Reduce the throttle to low idle — bring the engine down to its lowest RPM setting. Let the hydraulic system depressurize gradually rather than slamming from working speed to off.
- Run at idle for the manufacturer's recommended cooldown period — typically three to five minutes, though your specific model's operating manual sets the exact duration. This idle time lets the turbocharger spool down while oil is still circulating, and it allows coolant to absorb residual heat from the engine block before flow stops. Stopping a hot turbocharged engine immediately after heavy work risks bearing damage that shortens turbo life significantly.
- Turn the key off (or press the stop button) — confirm the engine shuts down cleanly with no unusual knock or rattle on the last rotation.
- Engage the safety lock lever — raise the gate lever to its locked position so no joystick, pedal, or travel lever can activate hydraulic functions. This is non-negotiable, even if you plan to walk away for only a few minutes.
- Exit using three points of contact — face the machine while climbing down, maintaining two hands and one foot or two feet and one hand on the steps and grab handles at all times. Never jump from the cab or the track frame.
Once you are on the ground, take a brief post-operation walk-around. Look for fresh hydraulic leaks that appeared during the shift, check for material packed into the undercarriage, and note any developing issues — a weeping hose fitting, a new vibration you felt in the pedals, a track that seemed to steer sluggishly. Log these observations so the next operator or maintenance technician can act before a minor finding becomes a major repair.
Troubleshooting Jerky Movements and Loss of Control
Every new operator hits the same wall during the first few hours of seat time. The boom lurches, the swing overshoots, the bucket curls at the wrong moment — and the instinct is to blame the machine. In almost every case, the machine is fine. The inputs are the problem. Here are the four most common beginner issues and a practical fix for each:
Jerky boom and stick motion. This happens when you shove the joystick to full throw instead of feathering it through a partial range. Excavator hydraulics are proportional — half-throw produces half-speed. The fix is deliberate: drop the throttle to low idle and practice moving the boom up and down using only the first third of the joystick's travel. You will notice the movement becomes smooth and predictable. Once that feels natural, gradually increase the range. Building muscle memory at slow speed eliminates the full-throw reflex that causes jerky cycling under production pressure.
Uncontrolled swing. The upper structure carries momentum. A loaded bucket swung at high RPM does not stop the instant you release the joystick — it coasts past your target, forcing a correction swing that wastes time and risks striking obstacles. The remedy is simple: reduce the throttle setting while you are learning. Lower engine RPM means lower hydraulic flow, which means slower swing speed and shorter coast distance. As your timing improves, raise the throttle incrementally. Trying to learn swing control at full RPM is like learning to drive a car on a highway — technically possible, but needlessly risky.
Over-digging past the target depth. Beginners tend to focus on the bucket and forget the grade. The stick pulls through the soil, the operator keeps crowding, and the trench ends up six inches deeper than design — which means backfilling, recompacting, and lost time. The fix is a mental checkpoint: before every dig pass, set a depth target in your mind relative to a visible reference (a grade stake, a paint mark on the trench wall, or a laser receiver reading). Check depth every three to four passes rather than waiting until the trench is complete. Frequent checks catch drift early, when correction takes one pass instead of twenty minutes of rework.
Improper bucket curl timing. Curling too early scoops a shallow bite and leaves material in the trench. Curling too late lets loose soil spill over the back of the bucket during the lift. The visual cue that fixes both errors: watch the angle of the bucket teeth relative to the ground as the stick pulls back. When the teeth begin to ride up and out of the cut naturally — losing their bite — that is the moment to curl. Practice this timing at low throttle in soft soil until the cue becomes automatic, then move to harder material where the feedback through the joysticks reinforces the same pattern.
A common thread runs through all four fixes: slow down. Reducing throttle speed gives your brain more processing time per movement, and that extra fraction of a second is where coordination develops. Speed comes later, as a byproduct of smooth technique — not as a goal in itself.
Building Operator Confidence Through Deliberate Practice
Reading about excavator operation builds knowledge. Seat time builds skill. The gap between the two closes only through structured, repetitive practice — not random digging.
If you have access to an open area with soft, workable soil, run this three-phase exercise that mirrors real job-site tasks:
- Phase 1 — Dig a straight trench. Mark a line on the ground with spray paint or stakes. Trench along it to a consistent depth (pick a manageable target like three feet). Focus on maintaining straight walls, a flat floor, and a clean spoil pile set back from the edge. This phase trains boom-stick coordination and depth awareness.
- Phase 2 — Backfill the trench. Swing the spoil pile back into the trench and spread it evenly. This phase forces you to reverse the dig cycle — dumping material precisely rather than just removing it — and develops your feel for bucket angle during placement.
- Phase 3 — Grade the surface flat. Drag the bucket across the backfilled area with minimal downward pressure until the ground returns to its original profile. This phase is the most demanding because it requires the lightest joystick inputs and the most patience. Checking with a level or straightedge reveals exactly where your technique still needs refinement.
Log your practice hours. Track what felt awkward and what improved. Gradually increase the throttle setting across sessions — start at low idle for the first several hours, move to mid-range as your coordination tightens, and work toward full operating RPM only when combined movements feel fluid and predictable. Many training programs recommend a minimum of 40 supervised practice hours before an operator takes on production work, though the actual number varies by individual aptitude and machine complexity.
Confidence also grows through machine familiarity. The more time you spend on one specific excavator, the better you internalize its response characteristics — how fast the swing decelerates, how much stick force the hydraulic pump delivers at a given RPM, how the tracks behave on wet clay versus dry gravel. That machine-specific intuition, sometimes called mechanical sympathy, is what experienced operators describe when they say the excavator feels like an extension of their body.
For operators and contractors who have worked through the learning curve and are ready to source their own machine, comparing options across multiple brands and size classes is the logical next step. JIUHONG's used excavator collection brings together compact through full-size machines from a range of manufacturers, making it straightforward to request model-specific quotes — whether you need a single unit for a growing fleet or bulk purchases for dealer inventory.
Learning how to operate a excavator is not a single event — it is a progression. The eight steps in this guide move from understanding the machine's anatomy, through selection, inspection, controls, startup, digging technique, attachments, safety compliance, and finally shutdown and self-correction. Each step builds on the one before it. Master them in order, practice with intention, and the excavator stops being an intimidating piece of heavy equipment and starts being the most productive tool on your site.
Frequently Asked Questions About Using an Excavator
1. What is the difference between ISO and SAE excavator joystick patterns?
ISO and SAE patterns swap the boom and stick functions between the left and right joysticks on their fore-aft axes. In the ISO pattern (often called excavator or CAT controls), the left joystick controls the stick in/out while the right joystick handles boom up/down. The SAE pattern (sometimes called backhoe or John Deere controls) reverses those assignments. Swing left/right always stays on the left stick and bucket curl/dump always stays on the right stick in both layouts. Most modern excavators include a selector valve or electronic switch that lets you toggle between patterns, but you should always confirm the active setting inside the cab before making any inputs.
2. Do you need a license or certification to operate an excavator?
There is no single federal license required to operate an excavator in the United States. Requirements vary by state, municipality, and project type. Some jurisdictions mandate formal certification through organizations like NCCCO (National Commission for the Certification of Crane Operators) or NCCER (National Center for Construction Education and Research), while others accept documented employer-provided training. For the strongest employability profile, many operators pursue credentials from both NCCCO and NCCER. Regardless of the path you choose, always carry your wallet cards and training documentation on-site, as inspectors can request proof of competency at any time.
3. What should I check before starting an excavator each day?
A thorough pre-operation walk-around covers three main zones. First, check all fluid levels: engine oil, hydraulic fluid color and level, coolant, fuel, and DEF if equipped. Second, inspect the undercarriage for proper track tension (typically two to three inches of sag at midpoint), worn sprocket teeth, damaged track shoes, and debris buildup. Third, trace every visible hydraulic hose for bulges, leaks, or cracks, examine bucket teeth for wear, and check boom and stick weld joints for stress fractures. Before entering the cab, verify mirrors, seat belt function, horn, and backup alarm. This routine takes roughly ten to fifteen minutes and prevents the majority of common on-site mechanical failures.
4. How do I dig a straight trench with an excavator?
Start by establishing a depth and alignment reference using grade stakes or a laser receiver mounted on a grade rod. Execute the four-phase dig cycle on each pass: position the bucket teeth at a slight forward angle, crowd the stick toward the cab, curl the bucket when it reaches about three-quarters full, then lift and swing to the spoil pile. Maintain a consistent bucket angle so the trench floor stays level rather than scalloped. After each digging pass, make a flat cleaning drag along the bottom to smooth ridges. Place the spoil pile well back from the trench edge to avoid surcharge loading on the walls, and check depth every three to four passes to catch drift before it requires major rework.
5. What size excavator do I need for residential or commercial work?
Machine selection depends on dig depth, site access, and project scope. For residential utilities like water lines or irrigation, a mini or compact excavator in the 1- to 5-ton range handles typical depths and fits through narrow access points such as backyard gates. Residential foundations and driveways generally call for a mid-size machine between 5 and 10 tons for adequate dig depth and bucket volume. Commercial foundations and deep utility corridors require a standard excavator in the 10- to 30-ton class. Major earthmoving or road cuts demand machines above 30 tons. When two classes could handle the job, the smaller machine that meets the site constraints is usually the more cost-effective choice. Platforms like JIUHONG's used excavator collection at jiuhong-machinery.com let you compare compact through full-size machines across multiple brands to find the right fit.